Google Pay
The Google Pay offers a quick and easy path to enable secure, one touch payments in your app.
This guide explains how to process payments with our SDK.
Requirements
- A Mobile SDK integration (Ready-to-Use UI or SDK & Your Own UI)
- A Google account, when you're ready to deploy your Google Pay integration, sign-up to get access and test with production credentials.
Configuration
Open the build.gradle file in the app module and add the following to the dependencies block:
implementation "com.google.android.gms:play-services-wallet:x.x.x"
Adding the Google Pay to your app must be done in one of two ways, depending on whether you are using the Ready-to-Use UI or the SDK & Your Own UI. These two ways are covered in the sections below. Please follow the instructions relevant to the approach you have chosen.
Ready-to-Use UI
Add GOOGLEPAY payment brand
Create the CheckoutSettings, and add the GOOGLEPAY to the payment brands list:
Set<String> paymentBrands = new HashSet<String>();
paymentBrands.add("GOOGLEPAY");

CheckoutSettings checkoutSettings = new CheckoutSettings(checkoutId, paymentBrands, Connect.ProviderMode.TEST);
val paymentBrands = hashSetOf("GOOGLEPAY")

val checkoutSettings = CheckoutSettings(checkoutId, paymentBrands, Connect.ProviderMode.TEST)
If you integrate the Google Pay using our drop-in buttons, set the GOOGLEPAY payment brand in the PaymentButtonFragment.
paymentButtonFragment.setPaymentBrand("GOOGLEPAY");
paymentButtonFragment.paymentBrand = "GOOGLEPAY"Configure PaymentDataRequest
Create JSONObject to configure Google Pay widget with the transaction info, allowed payment methods and card networks.
Use PaymentDataRequestJsonBuilder to easily create base paymentDataRequestJson object with all required parameters.
Then you can add some optional configurations, e.g. enable requesting shipping info in the widget. Please refer to the Google Pay Payments API documentation for more options.
JSONArray allowedPaymentMethodsJson = new JSONArray()
        .put(new CardPaymentMethodJsonBuilder()
                    .setAllowedAuthMethods(new JSONArray()
                            .put("PAN_ONLY")
                            .put("CRYPTOGRAM_3DS")
                    )
                    .setAllowedCardNetworks(new JSONArray()
                            .put("VISA")
                            .put("MASTERCARD")
                            .put("AMEX")
                            .put("DISCOVER")
                            .put("JCB")
                    )
                    .setGatewayMerchantId("yourEntityId")
                    .toJson()
        );

JSONObject transactionInfoJson = new TransactionInfoJsonBuilder()
        .setCurrencyCode("USD")
        .setTotalPriceStatus("FINAL")
        .setTotalPrice("100.00")
        .toJson();

JSONObject paymentDataRequestJson = new PaymentDataRequestJsonBuilder()
        .setAllowedPaymentMethods(allowedPaymentMethodsJson)
        .setTransactionInfo(transactionInfoJson)
        .toJson();
val allowedPaymentMethodsJson = JSONArray()
        .put(CardPaymentMethodJsonBuilder()
                    .setAllowedAuthMethods(JSONArray()
                            .put("PAN_ONLY")
                            .put("CRYPTOGRAM_3DS")
                    )
                    .setAllowedCardNetworks(JSONArray()
                            .put("VISA")
                            .put("MASTERCARD")
                            .put("AMEX")
                            .put("DISCOVER")
                            .put("JCB")
                    )
                    .setGatewayMerchantId("yourEntityId")
                    .toJson()
        )

val transactionInfoJson = TransactionInfoJsonBuilder()
        .setCurrencyCode("USD")
        .setTotalPriceStatus("FINAL")
        .setTotalPrice("100.00")
        .toJson()

val paymentDataRequestJson = PaymentDataRequestJsonBuilder()
        .setAllowedPaymentMethods(allowedPaymentMethodsJson)
        .setTransactionInfo(transactionInfoJson)
        .toJson()
Set it to the CheckoutSettings.
NOTE: For GOOGLEPAYTKN we have introduced a new method, setGateway(@NonNull String gatewayName), in the CardPaymentMethodJsonBuilder class. You must pass the gateway name provided by your acquirer when using this method.
new CardPaymentMethodJsonBuilder()
.setGateway("example_provider_gateway_name")
new CardPaymentMethodJsonBuilder()
.setGateway("example_provider_gateway_name")checkoutSettings.setGooglePayPaymentDataRequestJson(paymentDataRequestJson.toString());
checkoutSettings.googlePayPaymentDataRequestJson = paymentDataRequestJson.toString()Collecting shopper information
You can collect additional information with the Google Pay widget before submitting the transaction, e.g. shipping information.
Configure payment data request
In addition to the previous steps complete configuration of the paymentDataRequestJson object to request additional information from the shopper. Refer to the Payments API to see the full list of options.
JSONObject paymentDataRequestJson = new PaymentDataRequestJsonBuilder()
        .setAllowedPaymentMethods(allowedPaymentMethodsJson)
        .setTransactionInfo(transactionInfoJson)
        .setShippingAddressRequired(true)
        .setEmailRequired(true)
        .toJson();
val paymentDataRequestJson = PaymentDataRequestJsonBuilder()
        .setAllowedPaymentMethods(allowedPaymentMethodsJson)
        .setTransactionInfo(transactionInfoJson)
        .setShippingAddressRequired(true)
        .setEmailRequired(true)
        .toJson()
Configure receiving callbacks from the checkout
The CheckoutActivity may send the callback CheckoutActivity.ACTION_ON_BEFORE_SUBMIT when shopper submits the payment.
To receive it you should complete the following steps:
1. Create your broadcast receiver to listen the intents from CheckoutActivity.
See below how to receive PaymentData object with the requested data from the Google Pay widget. Refer to the Payments API for the class definition.
public class CheckoutBroadcastReceiver extends BroadcastReceiver {

    @Override
    public void onReceive(Context context, Intent intent) {
        String action = intent.getAction();

        if (CheckoutActivity.ACTION_ON_BEFORE_SUBMIT.equals(action)) {
            // get shopper information for the Google Pay
            PaymentData paymentData = intent.getParcelableExtra(CheckoutActivity.EXTRA_GOOGLE_PAY_PAYMENT_DATA);

            if (paymentData != null) {
                // you can validate the PaymentData here, if data is not valid abort the transaction by adding
                // intent.putExtra(CheckoutActivity.EXTRA_TRANSACTION_ABORTED, true)
                // in this case the PaymentError with ERROR_CODE_TRANSACTION_ABORTED will be returned in the CheckoutActivityResult
            }

            String checkoutId = intent.getStringExtra(CheckoutActivity.EXTRA_CHECKOUT_ID);
            ComponentName senderComponentName = intent.getParcelableExtra(CheckoutActivity.EXTRA_SENDER_COMPONENT_NAME);

            // return control back to the CheckoutActivity
            Intent checkoutIntent = new Intent(CheckoutActivity.ACTION_ON_BEFORE_SUBMIT);
            checkoutIntent.setComponent(senderComponentName);
            checkoutIntent.setPackage(senderComponentName.getPackageName());
            checkoutIntent.addFlags(Intent.FLAG_ACTIVITY_NEW_TASK);
            // the EXTRA_CHECKOUT_ID is not required if transaction is aborted
            checkoutIntent.putExtra(CheckoutActivity.EXTRA_CHECKOUT_ID, checkoutId);

            context.startActivity(checkoutIntent);
        }
    }
}
class BroadcastReceiver : BroadcastReceiver() {

    override fun onReceive(context: Context, intent: Intent?) {
        val action = intent?.action

        if (CheckoutActivity.ACTION_ON_BEFORE_SUBMIT == action) {
            // get shopper information for the Google Pay
            val paymentData: PaymentData? = intent.getParcelableExtra(CheckoutActivity.EXTRA_GOOGLE_PAY_PAYMENT_DATA)

            if (paymentData != null) {
                // you can validate the PaymentData here, if data is not valid abort the transaction by adding
                // intent.putExtra(CheckoutActivity.EXTRA_TRANSACTION_ABORTED, true)
                // in this case the PaymentError with ERROR_CODE_TRANSACTION_ABORTED will be returned in the CheckoutActivityResult
            }

            val checkoutId = intent.getStringExtra(CheckoutActivity.EXTRA_CHECKOUT_ID)
            val senderComponent = intent.getParcelableExtra<ComponentName>(CheckoutActivity.EXTRA_SENDER_COMPONENT_NAME)

            // return control back to the CheckoutActivity
            val checkoutIntent = Intent(CheckoutActivity.ACTION_ON_BEFORE_SUBMIT)
            checkoutIntent.component = senderComponent
            checkoutIntent.setPackage(senderComponent!!.packageName)
            checkoutIntent.addFlags(Intent.FLAG_ACTIVITY_NEW_TASK)
            // the EXTRA_CHECKOUT_ID is not required if transaction is aborted
            checkoutIntent.putExtra(CheckoutActivity.EXTRA_CHECKOUT_ID, checkoutId)

            context.startActivity(checkoutIntent)
        }
    }
}
2. Declare your broadcast receiver in AndroidManifest.xml.
<receiver
    android:name=".CheckoutBroadcastReceiver"
    android:exported="false" />
NOTE: It is important to set android:exported="false" to your broadcast receiver. In this case the only messages the broadcast receiver can receive are those sent by components of the same application or applications with the same user ID.
3. To provide the best security our SDK uses directed broadcasts. This way our broadcast is received only by the specified BroadcastReceiver. For this reason you should add ComponentName of your receiver to CheckoutActivity intent.
CheckoutSettings settings = new CheckoutSettings(...);
ComponentName receiverComponentName = new ComponentName("yourPackageName", "yourReceiverClassName");
Intent intent = checkoutSettings.createCheckoutActivityIntent(this, receiverComponentName);

startActivityForResult(intent, CheckoutActivity.REQUEST_CODE_CHECKOUT);
val checkoutSettings = CheckoutSettings(...)
val receiverComponent = ComponentName("yourPackageName", "yourReceiverClassName")
val intent: Intent = checkoutSettings.createCheckoutActivityIntent(this, receiverComponent)

startActivityForResult(intent, CheckoutActivity.REQUEST_CODE_CHECKOUT)
Submitting shopper information
Instead of collecting information by yourself as explained above, you can use the mSDK to collect and submit it.
Configure CheckoutSettings
Set in the CheckoutSettings what information should be submitted.
- GooglePaySubmitType.BILLING - The shopper billing address.
- GooglePaySubmitType.CUSTOMER - The shopper name, surname, phone and email.
One or both options can be used.
checkoutSettings.setGooglePaySubmit(EnumSet.of(GooglePaySubmitType.BILLING, GooglePaySubmitType.CUSTOMER));checkoutSettings.setGooglePaySubmit(EnumSet.of(GooglePaySubmitType.BILLING, GooglePaySubmitType.CUSTOMER))Configure payment data request
The payment data request should be configured to include shopper information into payment data response.
JSONArray allowedPaymentMethodsJson = new JSONArray()
        .put(new CardPaymentMethodJsonBuilder()
        .setAllowedAuthMethods(new JSONArray()
                .put("PAN_ONLY")
                .put("CRYPTOGRAM_3DS")
        )
        .setAllowedCardNetworks(new JSONArray()
                .put("VISA")
                .put("MASTERCARD")
        )
        .setGatewayMerchantId("entityId")
        .setBillingAddressRequired(true)
        .setBillingAddressParameters("FULL", true)
        .toJson()
);

JSONObject paymentDataRequestJson = new PaymentDataRequestJsonBuilder()
        .setAllowedPaymentMethods(allowedPaymentMethodsJson)
        .setTransactionInfo(transactionInfoJson)
	// set shipping address required if you use GooglePaySubmitType.CUSTOMER,
	// some data can be taken from it if billing address is missing
        .setShippingAddressRequired(true)
        .setEmailRequired(true)
        .toJson();
val allowedPaymentMethods = JSONArray()
        .put(CardPaymentMethodJsonBuilder()
        .setAllowedAuthMethods(JSONArray()
                .put("PAN_ONLY")
                .put("CRYPTOGRAM_3DS")
        )
        .setAllowedCardNetworks(JSONArray()
                .put("VISA")
                .put("MASTERCARD")
        )
        .setGatewayMerchantId("entityId")
        .setBillingAddressRequired(true)
        .setBillingAddressParameters("FULL", true)
        .toJson()
)

val paymentDataRequestJson = PaymentDataRequestJsonBuilder()
        .setAllowedPaymentMethods(allowedPaymentMethodsJson)
        .setTransactionInfo(transactionInfoJson)
	// set shipping address required if you use GooglePaySubmitType.CUSTOMER,
	// some data can be taken from it if billing address is missing
        .setShippingAddressRequired(true)
        .setEmailRequired(true)
        .toJson()
Parameters mapping for BILLING:
| OPP parameter | Google Pay field |
|---|---|
| billing.street1 | paymentMethodData.info.billingAddress.address1 |
| billing.street2 | paymentMethodData.info.billingAddress.address2 and paymentMethodData.info.billingAddress3 |
| billing.city | paymentMethodData.info.billingAddress.locality |
| billing.state | paymentMethodData.info.billingAddress.administrativeArea |
| billing.postcode | paymentMethodData.info.billingAddress.postalCode |
| billing.country | paymentMethodData.info.billingAddress.countryCode |
Parameters mapping for CUSTOMER:
| OPP parameter | Google Pay field |
|---|---|
| customer.givenName | paymentMethodData.info.billingAddress.name (before first space) |
| customer.surname | paymentMethodData.info.billingAddress.name (after first space) |
| customer.phone | paymentMethodData.info.billingAddress.phoneNumber or shippingAddress.phoneNumber |
| customer.email |
Confirmation page

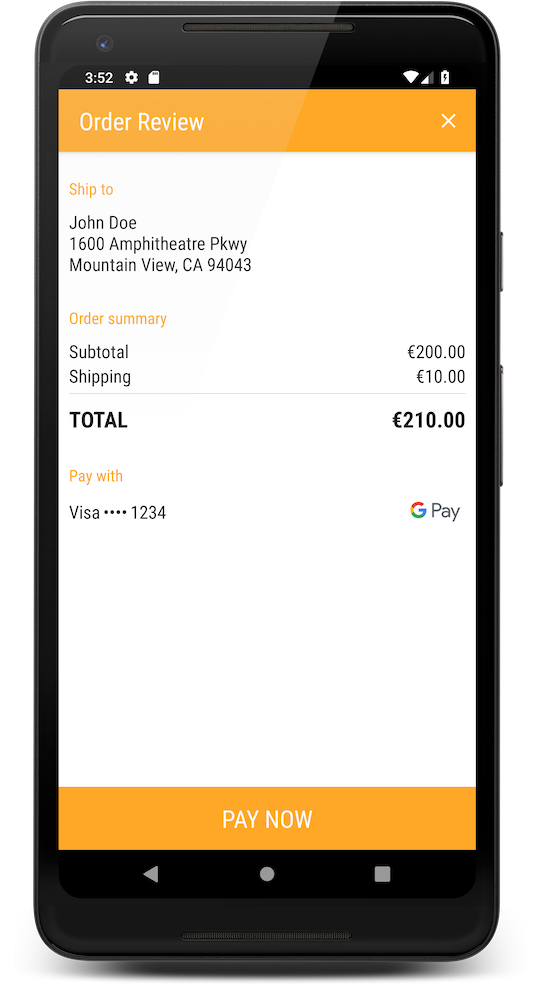
A final price must be displayed to the shopper before processing the transaction. If the amount to be charged has varied based on data received from the Google Pay widget you are expected to show a confirmation page with a final price. You can configure it in CheckoutActivity.ACTION_ON_BEFORE_SUBMIT callback.
1. Initialize OrderSummary object with order details, total amount and Google Pay PaymentData response object.
PaymentData paymentData = intent.getParcelableExtra(CheckoutActivity.EXTRA_GOOGLE_PAY_PAYMENT_DATA);

if (paymentData != null) {
    LinkedHashMap<String, Double> orderItems = new LinkedHashMap<String, Double>() {{
        put("Subtotal", 200.00);
        put("Shipping", 10.00);
    }};

    OrderSummary orderSummary = new OrderSummary(orderItems, 210.00, paymentData);
}
val paymentData: PaymentData? = intent.getParcelableExtra(CheckoutActivity.EXTRA_GOOGLE_PAY_PAYMENT_DATA)

if (paymentData != null) {
    val orderItems = linkedMapOf(
            "Subtotal" to 200.00,
            "Shipping" to 10.00
    )
    val orderSummary = OrderSummary(orderItems, 210.00, paymentData)
}
2. Add OrderSummary extra to the CheckoutActivity intent.
checkoutIntent.putExtra(CheckoutActivity.EXTRA_ORDER_SUMMARY, orderSummary);
checkoutIntent.putExtra(CheckoutActivity.EXTRA_ORDER_SUMMARY, orderSummary)3. Start checkout activity to return control back to the sdk and show confirmation page.
SDK & Your Own UI
Follow this tutorial to integrate the Google Pay into your UI.
Use PaymentDataRequestJsonBuilder to easily create base paymentDataRequestJson object with all required parameters.
GooglePayPaymentParams with a received token and actual card brand:
PaymentParams paymentParams = new GooglePayPaymentParams(checkoutId, token, cardBrand);val paymentParams = GooglePayPaymentParams(checkoutId, token, cardBrand)NOTE: The actual card brand should be taken from com.google.android.gms.wallet.PaymentData. If it's 'MASTERCARD' then 'MASTER' should be used as a card brand.
And submit the transaction:
Transaction transaction = null;

try {
    transaction = new Transaction(paymentParams);
    paymentProvider.submitTransaction(transaction);
} catch (PaymentException ee) {
    /* error occurred */
}
try {
    val transaction = Transaction(paymentParams)
    paymentProvider.submitTransaction(transaction)
} catch (ee: PaymentException) {
    /* error occurred */
}
NOTE: For GOOGLEPAYTKN, we have introduced one parameter in constructor named as paymentBrand.
Use this parameter for GOOGLEPAYTKN payment brand.
